Showing posts with label Recipe. Show all posts

Wednesday, September 17, 2014

Egg & Caramelized Onion Sandwich

Today I decided to get a little creative and create my own signature sandwich. To be honest, I kind of threw what I had in the fridge into a sandwich. The good news is it turned out tasting pretty amazing! Here is my own unexpected creation: the egg & caramelized onion sandwich.


I didn't actually expect for this to become a recipe, so I didn't take a step by step picture tutorial, but it is pretty simple to explain.

Here are the ingredients:
- 2 slices of bread
- 1 or 2 eggs (to taste)
- 1/4 of an onion
- White cheddar cheese
- Mayonnaise
- Sriracha
- Canola oil
- Salt & pepper

The only cooking truly required for this sandwich is the onions. For them to be perfectly caramelized you want to slowly cook them on low heat in oil. When you notice they are getting brown, that's when you know the onions are ready!

Boil your eggs to your liking. I personally like the yolk to be a little under cooked, so I boil them for about 10 minutes and insert them into ice cold water immediately to stop them from cooking further. Once they have cooled, slide them up and salt & pepper them to taste.

I made my own spicy mayo, in which I simply mix equal parts of mayonnaise and sriracha.

You are now ready to put the sandwich together! Pile up those ingredients! I love toasted bread, so I cooked my slices "grilled cheese style". Its all up to you how you like your sandwich, but just imagine that yummy melted cheddar!

Next time I might even try adding a couple slices of bacon. Bacon makes everything better right?

Friday, August 29, 2014

Red Pepper Baked Brie


I blame my lack of food blogging during the last couple of weeks on my slightly upset stomach, but don't you worry because I am back and better than ever!

This time I have a delicious appetizer that is way too simple to make to be that delightful! The reason why I love it so much might be because Brie is my favourite cheese after Le Fromage St-Fidele (if your are ever in the Charlevoix region, PLEASE hunt some down).

There's a little back story to this recipe. One of my good friends is on the verge of giving birth and I won this Rootham Tangy Red Pepper Jelly at her baby shower. Apparently I was the only person who never tried it before, and as soon as someone recommended that I try it with brie I couldn't have been happier about winning it.


Here are the ingredients:
- Brie
- Rootham Tangy Red Pepper Jelly
- Baguette


I cut off the top crust of the brie. The rest of the crust will serve as a bowl for the cheese so that it doesn't melt away into a puddle


Slice up that baguette!


Spread that jelly on top of that Brie. You don't need to use this particular brand or flavour. Brie is delicious with practically any jelly or jam. One of my favourites is the mixture of apricot jam with Brie!


Be sure to put your Brie in a pan with a tall border in case things get messy and cheesy. Put the oven at 350 ° F and let the magic happen for 15 minutes. Halfway through, add your baguette to the oven if you want it crispy.


And there you have it! A succulent baked brie, all done in less than 20 minutes with such minimal effort! Don't deny that you are dying to try this at your next event ;)


Wednesday, August 13, 2014

Chicken Pesto Pasta


I am a huge fan of daily Vlogger on YouTube itsJudysLife. I've followed the family's daily lives for years now, and I've always admired her husband Benji's initiative when it came to cooking. He takes it very seriously, and everything always looks delicious!

He has his own YouTube channel he dedicates to cooking called BenjiManTV, which is where this recipe comes from. I always like to guesstimate when I'm cooking, so I may not have followed the recipe to the letter!


What I used (portion for 2):
- Boneless chicken tights (3)
- Spaghetti (or any pasta of your choice)
- Pesto (already made)
- Diced onions
- Grated parmesan
- Olive Oil
- Salt & pepper


While the spaghetti was cooking to package directions, I cooked the chicken and the onions on an oiled pan. I wanted the chicken to be brown and crispy the onions to be somewhat caramelized for this recipe. 

I definitely recommend you make use of chicken tights if you can. Another quick tip for the spaghetti is to salt it when it hits a boil to flavor those noodles!


Before everything was finished cooking, I combined the pesto, a little bit of oil, the grated parmesan and pepper in a bowl. This step kind of comes with taste. The trick with the perfection of this recipe is to taste test during the process and see how you specifically like it!


Immediately after the chicken and pasta was done cooking, I threw everything in a mixing bowl so that the heat of the noodles could melt that parmesan and heat up that pesto a little bit. Once you mix everything, I recommend that you taste it to determine if you want to add a little bit more pesto or not. On my side of things, I decided I need a bit more to satisfy my taste buds!


Last but not least, throw it in a plate and sprinkle a little parmesan atop your delicious meal!

If you love yourself some pesto pasta dishes, this is definitely a very simple yet delightful recipe you should try out!

Enjoy! :)

Tuesday, July 22, 2014

Homemade Ramen


I admit it, ramen is not the healthiest of meals, but it is one of my guilty pleasures. This recipe actually comes from me, and believe it or not, it was as good as any ramen I've had at Korean or Japanese restaurants!!


Here are the ingredients I used:
- Packet of dried ramen noodles (I used Shin Ramyun - shrimp flavour)
- Choice of ground meat (I used porc, veal, and beef)
- 1 egg
- Bean sprouts
- 1 clove of garlic
- Small piece of ginger
- 1 green onion
- Sriracha (at taste)
- Chilli garlic sauce (at taste)
- Soy sauce (2-3 tbsp)
- 1 tbsp Sesame oil
- Canola (or vegetable) oil
- Salt & pepper

I tried to use ingredients that were already in my kitchen, and it worked out great. Some of these ingredients should be used at your preferred taste, such as the sriracha and the chilli garlic sauce. These will depend on how much your taste buds love spicy and garlicky foods.


The first step was to toss the bean sprouts in a lightly canola oiled pan for a couple of minutes. Then I put these aside to get on with the meats.


Time to cook them meats. Originally I was going to get pork only, but my grocery store was out of pork and only had a pork-beef-veal variety pack, so I said "why not?". Prior to putting it in the pan, I combined my crushed garlic, finely cut ginger and the white part of the green onion with a tsp of canola oil. 


Once I added the meats, I also added my soy sauce, sesame sauce, sriracha and chilli garlic sauce. Then I let my meats cook completely and crushed some salt and pepper as a finishing touch. I am not lying when I say I could have eaten this mix all by itself, that's how good it was!

In the meantime, I cooked my egg in boiling water for about 7 minutes so that the white would be entirely cooked, but the yolk would still be in a somewhat liquid form. I immediately put it into ice water to let it cool completely.


It's time for the most important part, the ramen. I made the ramen using the instructions on the package, simple right? 

Obviously using dried noodles does make the ramen lose some of that authenticity, but this step saves so much cooking time. With all the other contrasting flavours in the mix, you don't even realize the dried noodles.


Now all the ingredients are all ready, its time for the layering, which I find is a big part of ramen. It's all about presentation right? But if its too much effort, just mix it all up, because that's how ramen is the best, when all the flavours are contrasted together.


If you try this recipe, it's up to you how you want to personalize it. Had I had seaweed at home I would have sprinkled some on top. Change the meat or add vegetables, its all up to you, but most importantly: ENJOY!!!!


Friday, July 11, 2014

Zucchini Turkey Ravioli

Let me start by saying that I have in no way created this recipe, and my blog is not about my cooking creations as I am not even near that level of cooking expertise. 

These Zucchini Turkey Ravioli come from a wonderful blog called Las Vegas Food Photograph Cindy Larkin. More specifically, I found this recipe on Pinterest, where I find most of my recipes nowadays!

I tweaked the ingredient amounts a little because I was only feeding two. But even with my reductions I could have easily fed 3 or even 4!


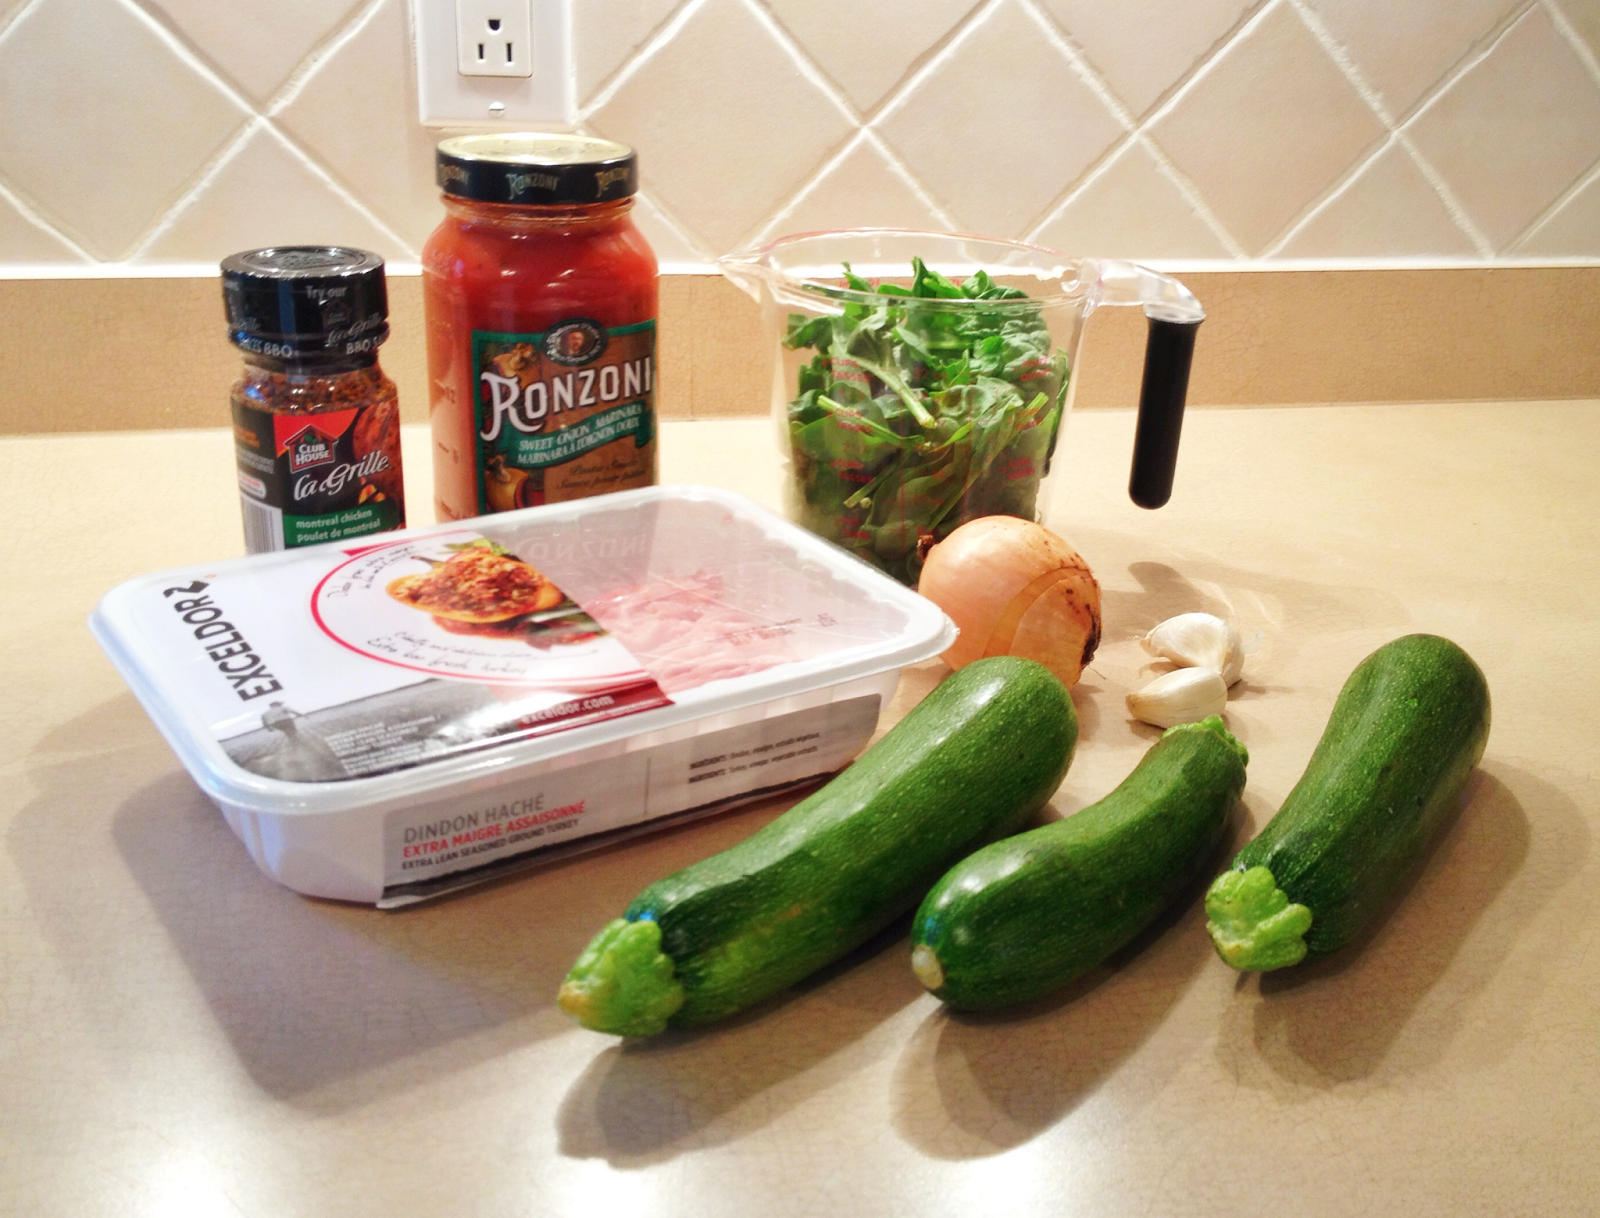
Here are the ingredients I used:
  • 1.0 lbs. ground turkey
  • 1.5 cups of spinach
  • 2 small zucchinis
  • 1 small onion
  • 2 cloves of garlic
  • 1 tbsp. Montreal Chicken Seasoning
  • Tomato and onion marinara sauce


The first thing I did was chop my spinach, onion, and garlic in a food processor. Once that was done, I combined this mixture with the ground turkey and the Montreal Chicken Seasoning on a medium heated pan.


While the turkey was slowly cooking on the stove, I started to cut my zucchini. Thankfully for me, I got a mandoline as a present a couple years ago. If you don't have a mandoline, you can still do it! You can use an apple/potato peeler or go back to the traditional knife and cutting board, but be careful with the fingers!


As I was slicing my zucchini, I made sure to regularly mix up my turkey blend!


That mix alone looked appetizing! Yum yum yum!


Now the fun was just about to begin! I arranged my zucchinis as above. I put two slices perpendicular to one slice. The only reason I did it this way is because I thought 4 slices of zucchini might be too many, but 2 slices wouldn't be enough. Go with what you think your taste buds would enjoy!

Once I placed the turkey mixture in the middle, it was all about carefully folding the ravioli in order to secure everything inside. Then, I placed these upside down in an oven safe pan so that they wouldn't bust open.


With the amount of ingredients I used, I was able to make 10 of these raviolis. I found 3 raviolis per person was the perfect amount, unless you have some very hungry bears on hand!

The final step was covering the dish with the Marinara sauce and cooking it. I cooked it at 350° F for 30 minutes. My oven always cooks faster than a regular oven, so in the future I would cook this for a maximum of 25 minutes.


How did I enjoy the dish? It was actually pretty dam good! I'd never tried the whole zucchini instead of pasta thing before, but now I know why it's so popular. 

If you're looking for a yummy and healthy alternative to wheat and pasta, I definitely recommend this Zucchini Turkey Ravioli!!

Wednesday, July 9, 2014

My Everyday Smoothie


Yes, I am that type of person. The one that refuses to eat breakfast in the morning.  The thought of actually chewing food an hour after I've woken up is disgusting to me and completely turns me off. But I do realize that having nothing in the belly in the morning does not lead to a productive and healthy day.

To solve my issue, I have been making smoothies as my breakfast meal for many years. I use to be so creative, and made different smoothies every morning. I have come to a point where I figured out the exact mix of fruits that I love, and I have been sticking to it. When I run out of an ingredient I use some creativity and use something different, tweaking it up a little (like I did today with the mango instead of the pineapple).


Here are the ingredients I use:
  • 1 banana (if you don't like that strong banana taste, use half)
  • 1 kiwi
  • A handful of frozen raspberries
  • A few pieces of pineapple (I ran out and substituted with mango)
  • About half a cup of milk
  • Half a tea spoon and green tea matcha (mine is from David's Tea)

Sometimes I will substitute some of the milk for cold water. If you want a sweeter "Jugo Juice" style smoothie, I suggest adding some orange juice, but I don't like mine too sweet!

I also like to add spinach when I have some on hand. You can easily add a handful of spinach without the taste of the smoothie changing at all, and you'll get all that nutritiousness into your breakfast. 

The green tea matcha might look a little scary, but this too does not really affect the taste of the smoothie itself. I've recommended it to friends who hate the taste of tea, and they use it in their smoothies as well. As you probably know, green tea as a lot of nutritional values; well matcha basically has 10x more! It's a cancer-fighter, a metabolism and energy booster, and so much more!

I throw it all in the blender, and there you go: an easy and healthy smoothie is ready! I definitely live by this recipe. It brightens my mornings and is my perfect breakfast. :)


Powered by Blogger.